


![]()
Comments are made using translation software.
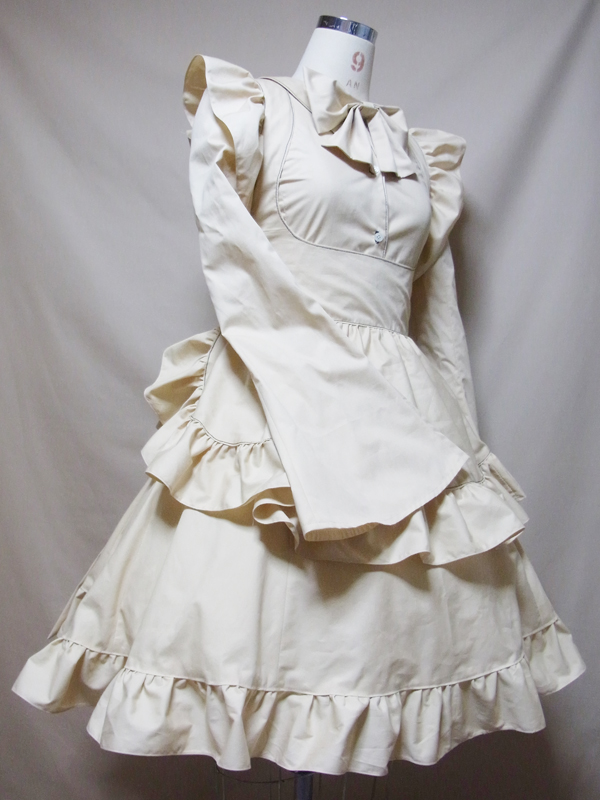
This is a pattern and instructions for making a maid outfit using only buttons, designed for those who struggle with zipper processes.
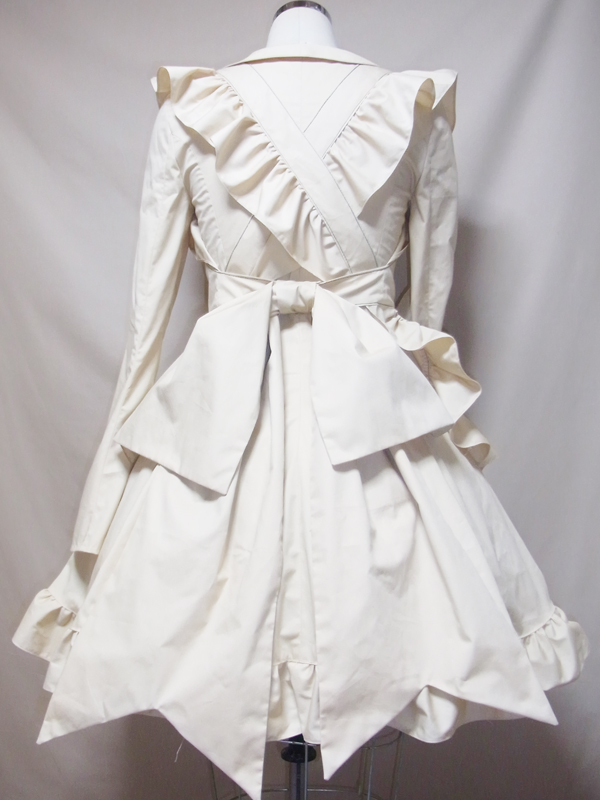
Based on a princess one-piece design with no front zipper, the collar is a flat collar sandwiched in the facing, and the apron's back portion is a simple pattern with buttons or Velcro.
We've designed the pattern with consideration for a clean line around the chest area for the apron.
The sleeves are also designed as bell sleeves to enhance the overall cuteness of the outfit.
Wearing a panier will further enhance the cute flare of the outfit.
Using American snaps or similar buttons will make the construction even easier.
The pattern includes lines for changing to a shorter length.
After printing, paste it according to the pasting line,Cut and use.
The pattern has a seam allowance, so it can be used as is.


I'm not so good at English.
So all explanations/instructions were translated using AI.
This is not always perfect and I apologise for any parts that are difficult to follow.
Princess dress process
(1) Apply fusible interlining to the "Collar" and "facing" with an iron.
(2) Connect the "facing" pieces, press open the seam allowance with an iron, and Serge/overlock the outer part.
![]() How to Serge/overlock (sewing machine & overlock sewing machine)
How to Serge/overlock (sewing machine & overlock sewing machine)
(3) Serge/overlock all sides, shoulders, and hems of the "Body" and "Sleeves".
(4) Sew the back center line of the "Back bodice", then sew the shoulder of the "Front bodice" (top side), and press open the seam allowance with an iron.
* If shaping with an iron is difficult, use topstitch to secure it.
(5) Sew the "Collar" together except for around the neck, turn it inside out, and press with an iron.
* Before turning inside out, trim the corners or leave a 2mm seam allowance for a neat finish.
(6) Align the "Collar" at the collar attachment position, sandwich it with the "facing", sew it together, turn it inside out, and shape with an iron.
* Before turning inside out, make notches in the seam allowance around the neck and trim the corners.
(7) Create buttonholes at the buttonhole positions.
* Buttonholes can be made at any time, but it's easier when the garment is smaller.
* For items like dot buttons, attach them at the end.
(8) Align the upper (bottom) side of the "Front bodice" with the center line, Serge/overlock it, press it down, and secure with topstitch.
* Attach the buttonholes on the upper side.
(9) Sew all sides of the "Body", press open the seam allowance with an iron, Serge/overlock the hem, fold it up 1cm (0.5in) inside, and sew on a sewing machine.
* When attaching frills or lace, adjust and attach them as you sew on the sewing machine.
(10) Sew the sides of the "Sleeve", press open the seam allowance with an iron, fold the hem up 1cm (0.5in) inside, and sew on a sewing machine.
(11) Align the bottom sides of the "Body" and "Sleeve", attach the "Sleeve" to the "Body", and Serge/overlock.
Chest ribbon process
(1) Apply fusible interlining to the ribbon.
(2) Open the back of the ribbon and the lower part for turning inside out, and sew with a French seam.
(3) Turn inside out from the opening and shape with an iron.
* Before turning inside out, leave a 2mm seam allowance at the corners for a neat finish.
* Secure the opening with iron adhesive tape or sew with a sewing machine.
(4) Fold the ribbon core along the fold line, insert the ribbon, and secure with a blind stitch.
(5) Thread the ribbon around the neck for the ribbon.
Ribbon production process
(1) Apply fusible interlining to the ribbon and ribbon core.
(2) Fold the ribbon, ribbon core, and lower part along the fold lines, open the turning inside out part, and sew with a French seam.
(3) Turn inside out from the opening and shape with an iron.
* Before turning inside out, leave a 2mm seam allowance at the corners for a neat finish.
* Secure the opening with iron adhesive tape or sew with a sewing machine.
(4) Attach velcro to the ribbon core for the "belt".
Apron process
(1) Apply fusible interlining to the upper part of the apron.
(2) Fold the upper part of the apron around the arms, back center line, and around the apron, and press with an iron to fold 1cm (0.5in).
* Make notches in the fabric where it curls when ironing to keep it settled.
(3) Sew the chest side, turn inside out, and sew topstitch.
* Cut the seam allowance of the chest side to 2mm before turning inside out for a neat finish.
(4) Insert gathered frills along the arm circumference of the upper part of the apron and sew topstitch to the position where the frills are attached.
* Also include the end of the frills when inserting.
(5) Cross the strings at the back, cross them and insert lace, and sew topstitch from the frill attachment position to the remaining part.
(6) Serge/overlock the gathered frill attachment position at the bottom of the apron and attach the gathered frill, then sew topstitch.
(7) Gather the bottom of the apron to 40cm, align it with the apron attachment position, insert it, and sew topstitch to secure.
* At this time, also secure the back center line with topstitch.
(8) Attach buttonholes and buttons at the button positions.
* Velcro is also acceptable.
If you cannot see the SHOP due to 403 error
Price: ¥1000 (JPY)
Approx. USD — / EUR — (for reference)
![]()
![]()
Children's 140 size
shoulder36cm bust77.5cm waist66.5cm A4 paper size 39 sheets
Sleeve parts 40 size

Children's 10 size
shoulder14.2in bust30.5in waist26.2in letter paper size 43 sheets
Sleeve parts 40 size

Ladies' S size
shoulder40.5cm bust85cm waist73cm A4 paper size 47 sheets
Sleeve parts 44 size
Ladies' S size
shoulder15.9in bust33.5in waist28.7in letter paper size 51 sheets
Sleeve parts 44 size
Ladies' M size
shoulder41.5cm bust92cm waist79.5cm A4 paper size 50 sheets
Sleeve parts 47 size
Ladies' M size
shoulder16.3in bust36.2in waist31.3in letter paper size 54 sheets
Sleeve parts 47 size
Ladies' L size
shoulder42.5cm bust100cm waist87cm A4 paper size 54 sheets
Sleeve parts 49 size

Ladies' L size
shoulder16.7in bust39.4in waist34.3in letter paper size 58 sheets
Sleeve parts 49 size
Ladies' LL size
shoulder43.5cm bust106cm waist92.5cm A4 paper size 57 sheets
Sleeve parts 51 size
Ladies' LL size
shoulder17.1in bust41.7in waist36.4in letter paper size 62 sheets
Sleeve parts 51 size
Men's L size
shoulder46cm bust110cm waist94.5cm A4 paper size 65 sheets
Sleeve parts 56 size
Men's L size
shoulder18.1in bust43.3in waist37.2in letter paper size 69 sheets
Sleeve parts 56 size
Men's LL size
shoulder47cm bust117cm waist98.5cm A4 paper size 72 sheets
Expanded sleeve parts 56 sizes to 105.4%

Men's LL size
shoulder18.5in bust46.1in waist38.8in letter paper size 75 sheets
Expanded sleeve parts 56 sizes to 105.4%


