


![]()
Comments are made using translation software.
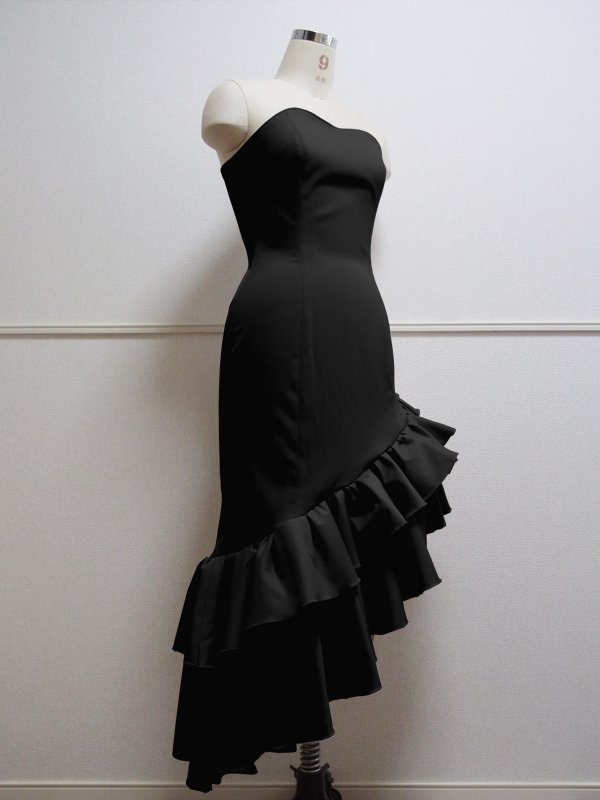
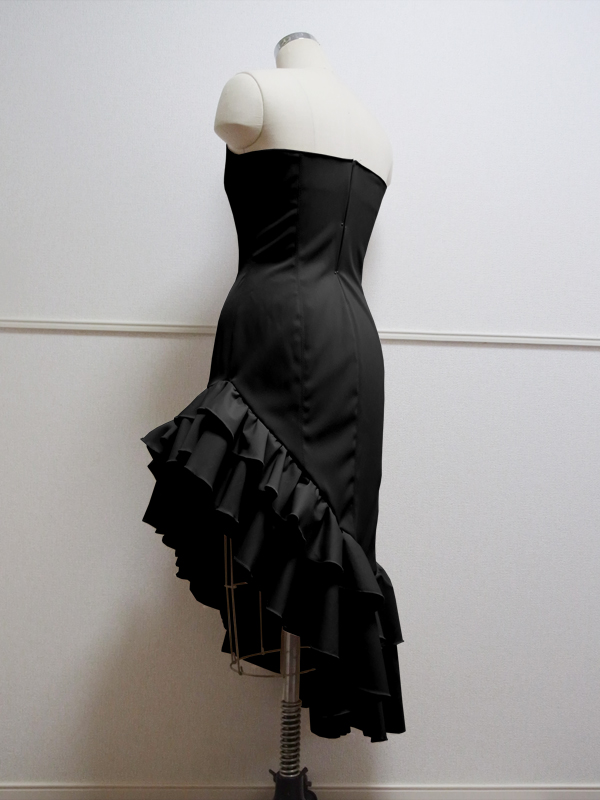
This is a pattern for a mermaid dress, as requested.
Since it doesn't feature an extremely tight silhouette, it might be advisable to size down if using stretch materials.
The construction process is relatively straightforward as it only involves sewing and connecting the sides at the armpits.
The difficulty level is set to 5 due to the considerable amount of ruffles at the hem, which may take some time to complete.
The hem ruffles are shaped in a unique way, as you can see from the pattern, so it's worth taking a look at them.
I believe this dress would look cute made from bridal satin as a handmade wedding dress, or in black for a more luxurious feel, as shown in the picture. It can be used for various purposes.
It's also suitable as a base for mermaid-themed cosplay costumes.
After printing, paste it according to the pasting line,Cut and use.
The pattern has a seam allowance, so it can be used as is.

The production process is explained with translation software.
* To attach a blast strap for preventing slipping, sandwich it between the "Body" and "facing" when sewing them together in step (7).
* When cutting the hem frill, cut one piece first to reduce the number of pattern pieces, then cut the pattern for reuse, so please be careful when cutting.
* This pattern does not include lining, so if using translucent fabric, create a lining pattern using the lines of the "facing".
(1) Apply fusible interlining to the front and back facings, sew them together, split the seam allowance with an iron, and Serge/overlock the outer side.
![]() How to Serge/overlock (sewing machine & overlock sewing machine)
How to Serge/overlock (sewing machine & overlock sewing machine)
(2) Serge/overlock the lines on sides A to G.
(3) Apply stay tape at the zipper attachment position.
(4) Sew up to the sewing stop position of seam line G and press the seam allowances open with an iron.
(5) Attach the invisible zipper at the zipper attachment position.
(6) Sew each seam line A to F, and press open the seam allowance with an iron.
* Splitting the seam allowance with topstitch along seam lines A to G will result in a neat finish.
(7) Sew the "facing" to the "Body", turn it inside out, shape with an iron, and stabilize with topstitch.
* When turning inside out, cut the hanging part of the fabric's seam allowance.
For the following steps, Serge/overlock is not necessary when using raw edge fabrics such as tulle for the hem frill.
(8) Serge/overlock the part where hem frills H and I will be sewn together.
(9) Sew together the front upper hem frill sections H and I, and the back upper hem frill sections H and I, and press open the seam allowance with an iron.
(10) Serge/overlock the hems of the upper and lower hem frill sections (rolled hemming for a sewing machine, rolled edge for a serger).
(11) Gather at the gathering positions of the upper and lower hem frill sections.
* It will be easier to attach to the "Body" if you baste the upper and lower hem frill sections together after gathering the frills.
(12) Attach to the "Body" at positions A to D for the frill alignment, and Serge/overlock the seam allowance together.
* If the fabric is too thick, Serge/overlock each separately for the "Body" and frill.
(13) Sew the Hook & bar eye at the hook positions.
How to purchase pay pattern from overseas
If you cannot see the SHOP due to 403 error
![]()

bust30.5in waist22.8in hip32.1in length37.8in 33sheets of A4 size(or legal size)
bust34.6in waist25.4in hip36.2in length44.9in 45sheets of A4 size(or legal size)
bust37.4in waist27.6in hip38.8in length46.7in 47sheets of A4 size(or legal size)
bust40.6in waist30.3in hip41.5in length48.4in 54sheets of A4 size(or legal size)
bust42.9in waist32.1in hip44.1in length50.6in 58sheets of A4 size(or legal size)
bust44.5in waist34.1in hip44.3in length52.2in 60sheets of A4 size(or legal size)
bust46.5in waist36.8in hip46.1in length53.5in 62sheets of A4 size(or legal size)


