


![]()
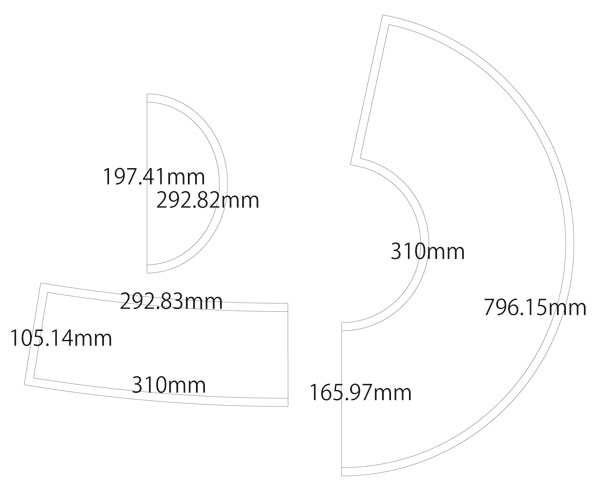
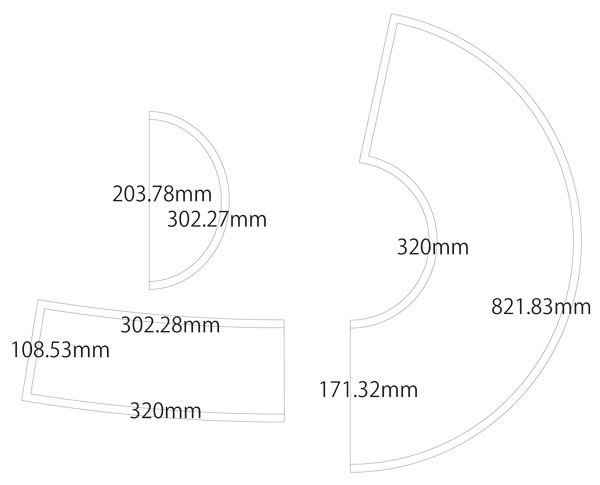
This is a sewing pattern and tutorial for a wide-brim hat that is also great for UV protection .
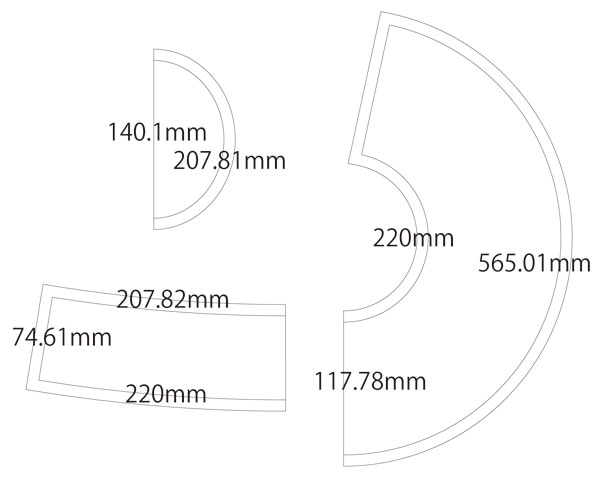
Apply a slightly firm fusible interfacing to the brim to help keep its shape.
Because firm interfacing is difficult to cut on the fold, actual-size interfacing pattern pieces are included instead, resulting in a few extra pages.
After printing, align and paste the pages along the joining lines, then cut along the outlines. Seam allowances are already included , so you can start sewing right away.

* Use a stiff fusible interfacing (heavy weight).
* Since stiff interfacing is difficult to cut on the fold, actual-size interfacing patterns are included instead.
* The interfacing is drafted about 12 mm smaller than the brim to make it easier to turn inside out. When attaching it to the brim, leave a 12 mm gap from the edge instead of 10 mm.
(1) Serge or overlock the side edges, sew them together into a loop, press the seam open with an iron, and topstitch.
(2) Apply the stiff fusible interfacing to one of the brim pieces.
(3) Sew the brim pieces together into a loop, press the seam open, and topstitch.
* Before attaching, fold the seam allowance of the outer brim edge (the side joining area) by 1 cm with an iron.
(4) Sew the two brim pieces together, trim the seam allowance leaving about 2 mm , turn right side out, and topstitch along the edge.
(5) Sew the top and side pieces together, then serge or overlock the seam allowance.
(6) Sew the side and brim together.
* First, sew the brim piece with the interfacing to the side. Then, fold the outer brim’s seam allowance (folded 1 cm earlier) to the inside and topstitch it for a neat finish .
![]()
Free Paper Patterns are possible because of your support.
If you use our patterns, please share them on social media and tell your friends.
Your support helps DRCOS continue to provide patterns in the future.
![]()
![]()
44cm
head size 44cm 5 sheets of A4 size


5 1/2(17.3in)
head size 17.3in 6sheets of letter size

46cm
head size 46cm 6 sheets of A4 size

5 3/4(18.1in)
head size 18.1in 6sheets of letter size
48cm
head size 48cm 6 sheets of A4 size

6(18.9in)
head size 18.9in 7sheets of letter size
50cm
head size 50cm 7 sheets of A4 size


6 1/4(19.6in)
head size 19.6in 7sheets of letter size
52cm
head size 52cm 7 sheets of A4 size

6 1/2(20.4in)
head size 20.4in 8sheets of letter size
54cm
head size 54cm 8 sheets of A4 size

6 3/4(21.2in)
head size 21.2in 8sheets of letter size
56cm
head size 56cm 8 sheets of A4 size

7(22in)
head size 22in 9sheets of letter size
58cm
head size 58cm 9 sheets of A4 size

7 1/4(22.8in)
head size 22.8in 10sheets of letter size
60cm
head size 60cm 9 sheets of A4 size

7 1/2(23.5in)
head size 23.5in 10sheets of letter size
62cm
head size 62cm 10 sheets of A4 size

7 3/4(24.3in)
head size 24.3in 11sheets of letter size
64cm
head size 64cm 11 sheets of A4 size

8(25.1in)
head size 25.1in 11sheets of letter size


