


![]()
Comments are made using translation software.
Many people who sew as a hobby often experience the accumulation of various fabric scraps... a mountain of leftovers!
That's why I've uploaded patterns for cute stuffed animals that can be made using the same fabric or by patching together scraps.
The construction process is very simple and can be done by hand sewing even without a sewing machine.
These patterns are also recommended for summer vacation craft projects.
I intentionally didn't include eye placements on the stuffed animals because I wanted people to customize the designs as they see fit.
These stuffed animals are also great gifts for children with atopic dermatitis or sensitive skin, as they are made with safe materials.
After printing, paste it according to the pasting line,Cut and use.
The pattern has a seam allowance, so it can be used as is.

The production process is explained with translation software.
* You can create cute items not only with the same fabric but also with various fabric scraps.
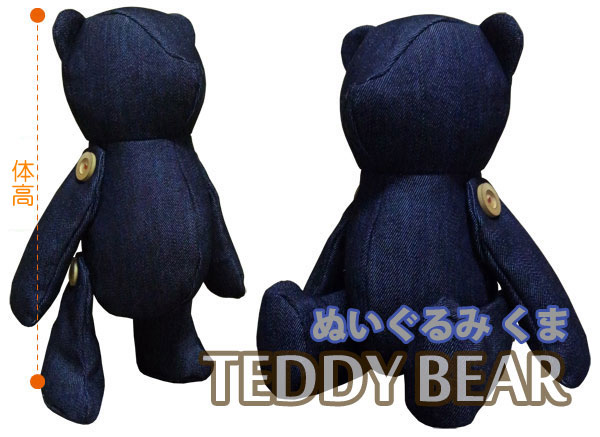
If you want to add a tail when making a teddy bear, you can attach a pom-pom or similar item using this faux fur material for a cute look.
There is no specific position for the eyes, so please attach them where you think they look cute.
Teddy Bear Making Process
(1) Sew along the dotted lines of the ears, then turn them inside out to create two ears.
(2) Insert the ears into their designated positions and sew the side seams of the head front and head back together (both sides).
(3) Sew the front side of the head front together.
(4) Sew along the head center line and the side of the head to finish shaping the head.
(5) Sew the front side of the body together.
(6) Sew the back side of the body together, leaving an opening for turning it inside out.
(7) Sew around the sides of the front and back of the body to shape the body.
(8) Sew the "Around the neck" of the head to the "Around the neck" of the body with the fabric right sides together.
(9) Sew along the dashed lines of the outer and inner arms, then sew the area where the arm flap is stitched.
(10) Sew along the dashed lines of the outer and inner legs, then sew the area where the leg flap is stitched.
(11) Turn the fabric inside out from the opening in the body.
(12) Stuff the head with cotton to shape the face, then firmly stuff the body with cotton and sew it closed.
(13) Stuff the arms and legs with cotton, then sew them closed (use less cotton for the area where the buttons will be placed).
(14) Attach the arms and legs with buttons at the designated positions.
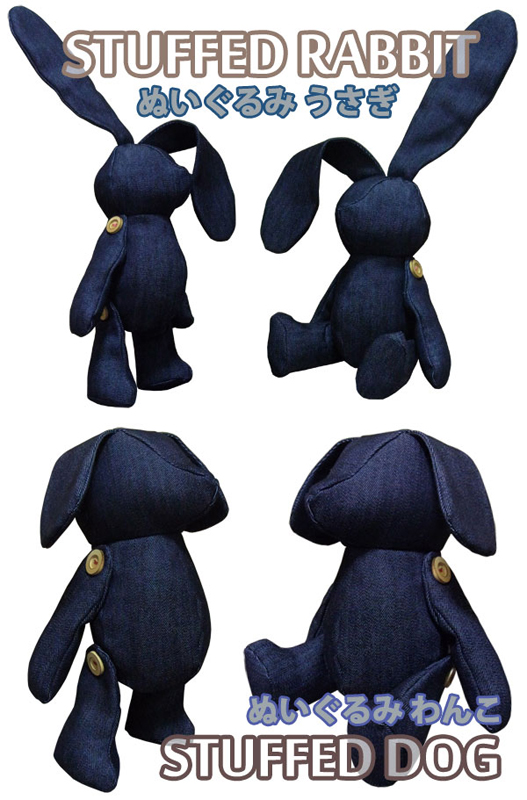
Rabbit Making Process
(1) Sew along the dotted lines of the ears, then turn them inside out to create two ears.
* If you want to fix the shape of the ears by standing them up or folding them, materials for use are posted on the site.
(2) Sew the front side of the head front together, then sew it to the front of the head along the head center line.
(3) Sew the back side of the head to the back of the head along the head center line.
(4) Insert the ears into their designated positions and sew the front and back of the head together.
(5) Sew the front side of the body together.
(6) Sew the back side of the body together, leaving an opening for turning it inside out.
(7) Sew around the sides of the front and back of the body to shape the body.
(8) Sew the "Around the neck" of the head to the "Around the neck" of the body with the fabric right sides together.
(9) Sew along the dashed lines of the outer and inner arms, then sew the area where the arm flap is stitched.
(10) Sew along the dashed lines of the outer and inner legs, then sew the area where the leg flap is stitched.
(11) Turn the fabric inside out from the opening in the body.
(12) Stuff the head with cotton to shape the face, then firmly stuff the body with cotton and sew it closed.
(13) Stuff the arms and legs with cotton, then sew them closed (use less cotton for the area where the buttons will be placed).
(14) Attach the arms and legs with buttons at the designated positions.
Dog Making Process
(1) Sew along the dotted lines of the ears, then turn them inside out to create two ears.
(2) Insert the ears into their designated positions and sew the side seams of the head front and head back together (both sides).
(3) Sew the front side of the head front together.
(4) Sew along the head center line and the side of the head to finish shaping the head.
(5) Sew the front side of the body together.
(6) Sew the back side of the body together, leaving an opening for turning it inside out.
(7) Sew around the sides of the front and back of the body to shape the body.
(8) Sew the "Around the neck" of the head to the "Around the neck" of the body with the fabric right sides together.
(9) Sew along the dashed lines of the outer and inner arms, then sew the area where the arm flap is stitched.
(10) Sew along the dashed lines of the outer and inner legs, then sew the area where the leg flap is stitched.
(11) Turn the fabric inside out from the opening in the body.
(12) Stuff the head with cotton to shape the face, then firmly stuff the body with cotton and sew it closed.
(13) Stuff the arms and legs with cotton, then sew them closed (use less cotton for the area where the buttons will be placed).
(14) Attach the arms and legs with buttons at the designated positions.
How to purchase pay pattern from overseas
![]()

3sheets of A4 size(or legal size)
Currently, only Japanese patterns are available.
4sheets of A4 size(or legal size)
Currently, only Japanese patterns are available.
3sheets of A4 size(or legal size)
Currently, only Japanese patterns are available.
7sheets of A4 size(or legal size)
Currently, only Japanese patterns are available.
8sheets of A4 size(or legal size)
Currently, only Japanese patterns are available.
8sheets of A4 size(or legal size)
Currently, only Japanese patterns are available.
10sheets of A4 size(or legal size)
Currently, only Japanese patterns are available.
23sheets of A4 size(or legal size)
Currently, only Japanese patterns are available.


