![]()
Comments are made using translation software.
With emphasized front opening and enlarged lines, it features a slightly loose design.
This is the pattern for a blouse with a chest piece and a collar.
After printing, paste it according to the pasting line,Cut and use.
The pattern has a seam allowance, so it can be used as is.


The production process is explained with translation software.
(1) Apply fusible interlining to the "Collar" and "Cuff" and press with an iron.
(2) Stitch each line on the chest pad, "Cuff", and "Collar".
* Make notches at the corners and curved parts of the "Collar" line for processing.
(3) French seam the chest pads together, turn inside out, shape with topstitch, and attach Sew on snaps.
(4) Serge/overlock the shoulders and sides of the "Front bodice", "Back bodice", and "Sleeve".
![]() How to Serge/overlock (sewing machine & overlock sewing machine)
How to Serge/overlock (sewing machine & overlock sewing machine)
(5) Stitch the shoulders and sides of the "Front bodice" and "Back bodice" together, and Press open the seam allowance with an iron.
* If the shape doesn't hold well with an iron, use topstitch, especially with polyester fabrics.
(6) Stitch the sides of the "Sleeve" together and Press open the seam allowance with an iron.
(7) Serge/overlock the hem of the "Body", fold up by 1cm (0.5in), and sew on a sewing machine.
(8) Stitch the "Cuff" into a loop, Press open the seam allowance with an iron, and fold the stitching line beforehand for easy insertion.
![]() How to sew sleeves and sleeve cuffs
How to sew sleeves and sleeve cuffs
(9) Attach the "Cuff" to the "Sleeve".
* Pay attention to the orientation when attaching the "Cuff" since it will be folded.
(10) Stitch the "Collar" right side together, turn inside out, and press with an iron.
* Pre-fold the part to be inserted around the neck with an iron for easy insertion.
(11) Sandwich the "Collar" into the "Body" and attach.
* After sandwiching the "Collar", hand-sew the back side of the tip for stability.
(12) Attach Sew on snaps to the Sew on snap positions on the "Body".
(13) Attach the "Sleeve" to the "Body" and Serge/overlock the armhole.
How to purchase pay pattern from overseas
![]()

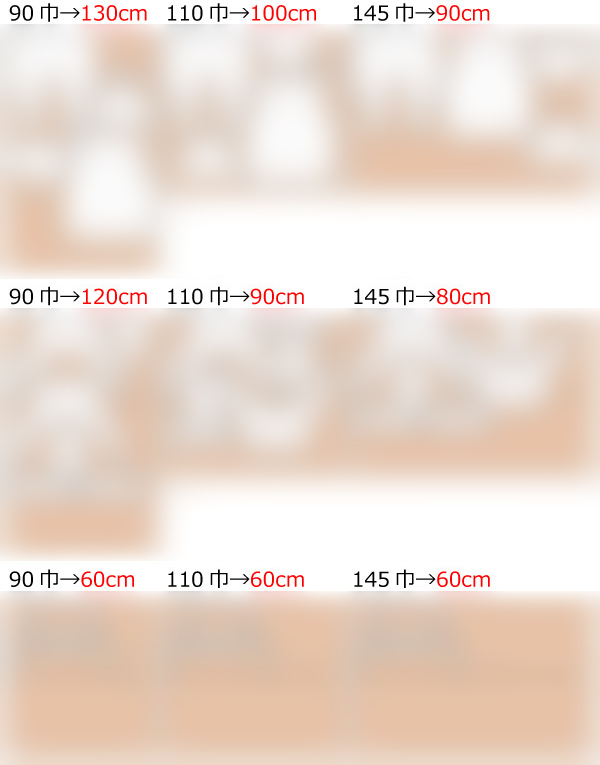
bust35.6in waist35in length23.2in 14sheets of A4 size(or legal size)
Sleeve parts 46 size
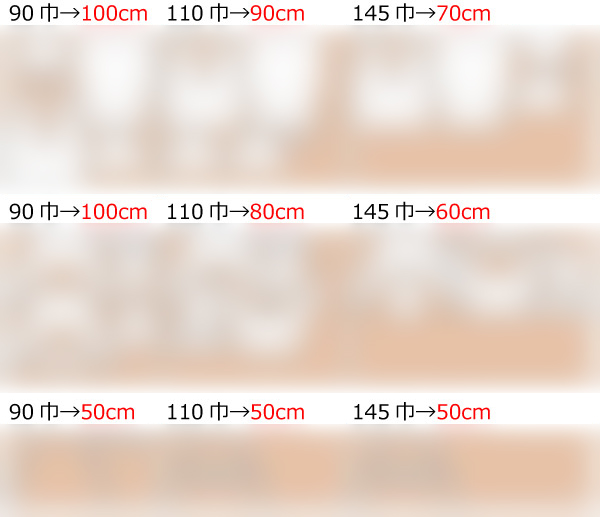
bust38.3in waist37.8in length24in 16sheets of A4 size(or legal size)
Sleeve parts 47 size
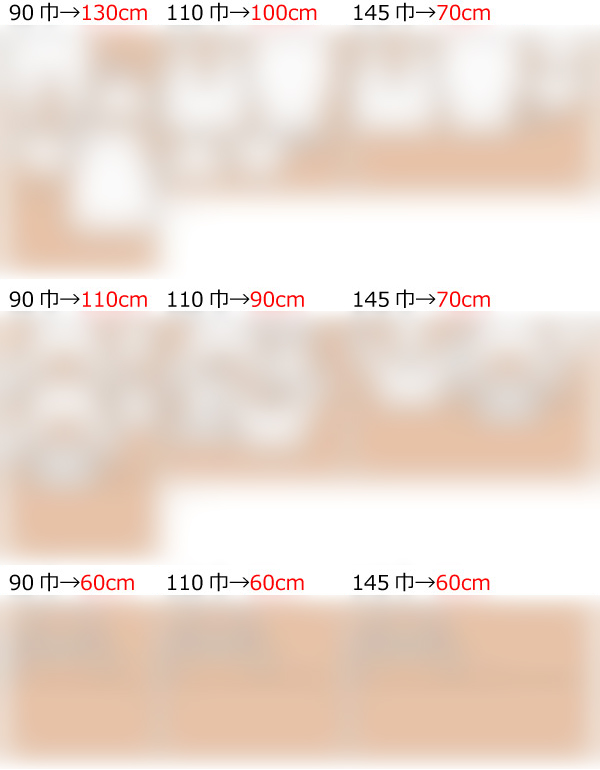
bust41.1in waist40.6in length25in 16sheets of A4 size(or legal size)
Sleeve parts 51 size